
Inserting images
What's related > Images
From your images folder
You will need to have imported the picture into your images folder before you can insert it on your page. See Importing files for details on how to do this.
- Position the cursor vertically where you want to the image to appear. Once the picture has landed on the page you will be able to align it to the left or right.
- from the Toolbars select Insert > Picture > From File.
- When the Picture window appears, open the images subfolder, if it is not already shown.
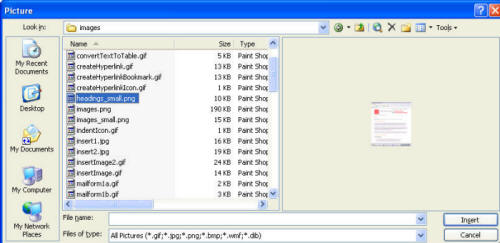
- Select the image you want to include. You'll see a preview of it in the right hand box.
- Click OK. The image will appear on the page.
It is not embedded in the page; rather, FrontPage, just like the browser, knows when displaying the page to include the image at that particular point. In other words, the page links to the image.
Aligning an image
To align the picture to the left or right,
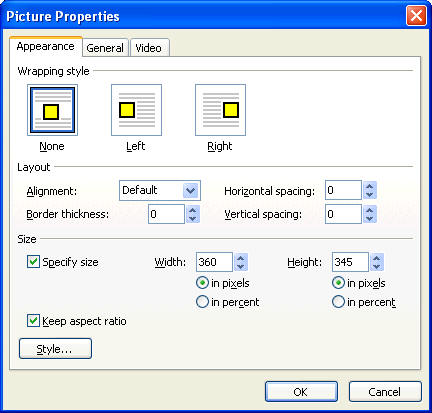
- Right-click the image, and select Picture Properties.
- Click on the Appearance tab and select one of the options under 'Wrapping style' - normally an image would align to the right of a page.
- Now add some alternative text to the picture
Adding alternative text
For accessibility reasons, you'll need to add some alternative text for users who have either opted not to view images or who have visual impairments and use a screen-reader.
- Right-click the image, and select Picture Properties.
- Click the General tab and in the Text field under Alternative representations enter a brief description of the image.

- Click OK.
- When you preview the page in the browser, the text will appear when you hover your mouse over the image.
From an external site
- Open the page containing the image in the web browser (for example a member of staff in Experts)
- Right click on the image and select Properties
- Select and copy the URL address
- Switch back to FrontPage
- Click on 'Insert Picture from File'
- Paste the address you copied into the URL box
- Click Insert
- The image will now appear on the page. Save the page and you will be prompted to save the image into your images folder. Our advice is not to do this but instead to link the file to its external URL.
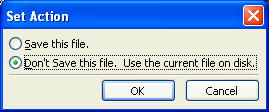
- When the Set Action box appears, choose the option Don't Save this file. Use current file on disk.
- Click OK.
Re-sizing images
When you insert an image on a page you may then want to reduce its size. FrontPage 2003 has a useful function to allow you to do this easily.
- Insert the image on the page as described above.
- Right-click over the image and select Picture Properties. From the Appearance tab look under the Size section.
- You will see the current width and height of the image measured in pixel size Make sure both 'Specify size' and 'Keep aspect ratio' boxes are ticked. Change the pixel size of the width. Provided the 'Keep aspect ratio' box is ticked, the height setting will adjust to fit the new width.
- As soon as the picture changes size, you will see a 'Picture Actions' box appear under the bottom right hand corner of the image.

- Click on the drop down arrow of this box and select 'Resample picture to match size'. Save the page.
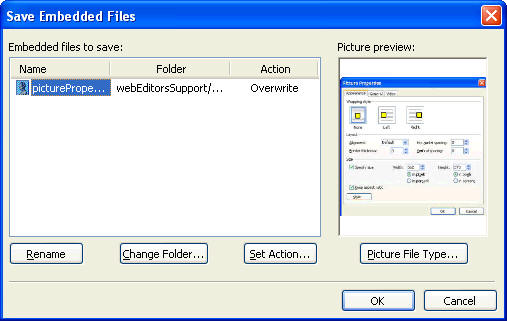
- You will then be prompted to save the embedded file into a folder, perhaps overwriting the original image with this new reduced one.
- Choose from these options and then click OK.
^ Back to top