How to create a standard form in FrontPage 2000
IMPORTANT: Never under any circumstances ask users to submit credit details or passwords as the information will not be encrypted and is vulnerable.
This document shows you how to create a form with the various fields arranged in a table. Instead of just the basic form's one-line text boxes, there are instructions on how to include scrolling text-boxes, check boxes, radio buttons and a drop-down menu.
Step 1
Position the cursor at the location on the page where you want the form to appear and select 'Insert' -> 'Form'->'One-Line Text Box'.
Your page will now include the following:

Text description
Screenshot of a one-line text box
The form is indicated by a broken line - this border will not appear in the browser. Along with the one-line text box, FrontPage will insert two buttons: the first enables the user to send the form whilst the second allows the user to return the form to its initial state.
Step 2
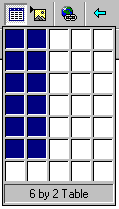
Having inserted the one-line text box, position the cursor to the right of the 'Reset' button and press 'Return'. The dotted line marking the boundary of the form will extend downwards. This creates some space in which to insert a table for arranging the form elements. Here's how:
|
|
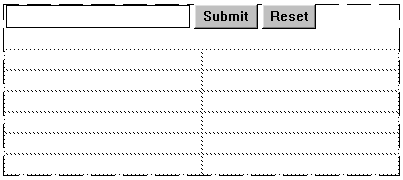
Your form should now appear as shown below:
Step 3
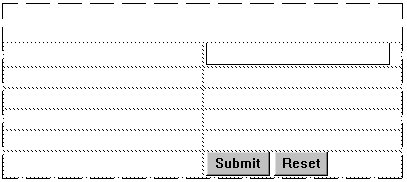
Having inserted the table, the next step is to drag the three form elements into the table. Here's how:
- Click the text-box with the left mouse-button and holding the button down, drag the box to the second column of the first row.
- Next drag the 'Submit' button to the second column of the last row.
- Repeat with the 'Reset' button.
Your form should now look as follows:
Step 4
Next add the following text to the first column: 'Your Name' and set the 'Form Field Properties' of the text-box as follows:
- Right-click the one-line text box and select 'Form Field Properties'.
- Change the 'Name' from 'T1' to 'Name'.
- Click 'OK'.
Step 5
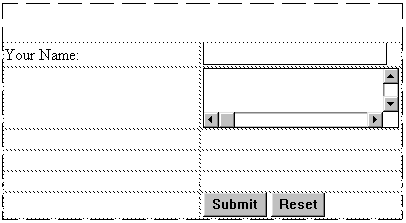
In the 'Basic Form' tutorial, another one-line text box was used to collect a message from the user. This time, a scrolling text box will be used:
- Position the cursor in the second column of the second row.
- Select 'Insert'->'Form'->'Scrolling Text Box'.
Your form should now appear as follows:
Step 6
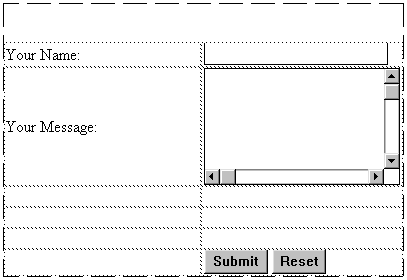
Add the text 'Your message' to the column beside the scrolling text box and set the scrolling text box properties:
- Right-click the scrolling text box and select 'Form Field Properties'.
- Type 'Message' as the 'Name'
Tip: Use either a single word or multiple words separated by the underscore character '_' as field names. Don't use spaces to separate multiple words.
- Set the 'Number of lines' as '5'.
- Click 'OK'.
The form should appear as follows:
Step 7
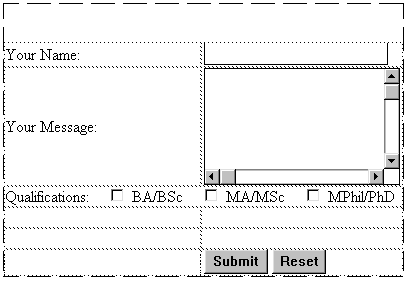
Another form element you might want to include on your page is check box. This allows the user to tick a number of options that you have predetermined:
- Select both cells of the third row, right-click and choose 'Merge Cells'.
- Position the cursor in the single column of the third row and type 'Qualifications:'. Press the spacebar five times to insert five blank spaces.
- Click the
 form icon to insert a check box and beside it type 'BA/BSc '. Press the spacebar five times to insert five blank spaces.
- Click the
 form icon again to insert a second check box and beside it type 'MA/MSc '. Press the spacebar five times to insert five blank spaces.
- Click the
 form icon a third time to insert another check box and beside it type 'MPhil/PhD'.
The form should now appear as follows:
Step 8
Here's how to set the checkbox options:
- Right-click the first checkbox and select 'Form Field Properties'.
- Change the 'Name' to 'Bachelors_degree' and the 'Value' to 'yes':
- Click 'OK'.
Repeat the procedure for the other two checkboxes, changing the 'Names' and 'Values' as follows:
- MA/MSc checkbox: Name=Masters_degree Value=yes
- MPhil/PhD: Name=MPhil_Doctorate Value=yes
Step 9
Check boxes enable the user to select more than one option. If you want the user to be able to just select one option out of a group, use radio buttons instead:
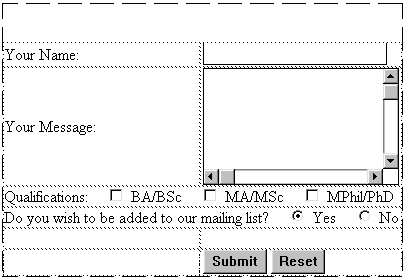
- Select both cells of the fourth row, right-click and choose 'Merge Cells'.
- Position the cursor in the single column of the fourth row and type 'Do you wish to be added to our mailing list?'. Press the spacebar five times to insert five blank spaces.
- Select 'Insert'->'Form'->'Radio Button' to insert a radio button and beside it type 'Yes'. Press the spacebar five times to insert five blank spaces.
- Select 'Insert'->'Form'->'Radio Button' again to insert a second radio button and beside it type 'No'.
The form should now appear as follows:
Step 10
You can specify which of the radio buttons is selected via the 'Form Field Properties':
- Right-click the first radio button and select 'Form Field Properties'
- Set the 'Group Name' as 'Add_to_mailing_list'.
IMPORTANT: If you change the 'Group Name' be sure to use the same name for all the radio buttons that make up the particular set of options. If you don't keep to the same group name, the buttons won't function properly.
- Set the 'Value' as 'yes'.
Tip: It is advisable to use either a single word or multiple words separated by the underscore character '_' as field names. Don't use spaces to separate multiple words.
- Change the 'Initial State' to 'Not Selected'.
- Click 'OK'.
- Repeat the above for the second radio button, using the same 'Add_to_mailing_list' group name but change the 'Value' to 'no' and the 'Initial State' to 'Selected'.
Step 11
Another form element you might want to add is a drop-down menu. Here's how:
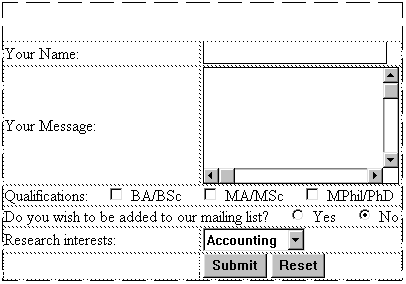
- Position the cursor in the second column of the fifth row and then select 'Insert'->'Form'->'Drop-Down Menu'.
- Right-click the drop-down menu and select 'Form Field Properties'.
- Set the 'Name' as 'Research_interests'.
Tip: It is advisable to use either a single word or multiple words separated by the underscore character '_' as field names. Don't use spaces to separate multiple words.
- Click the 'Add' button to add items to the menu.
- In the 'Add Choice' window, type 'Accounting' as the 'Choice'.
- Tick the 'Specify Value' - you can change the value if required.
- Click 'OK'.
- Repeat the above steps, adding another two choices: 'Economics' and 'Geography' - for both tick the 'Specify Value' box and leave the initial state as 'Not Selected'.
Note: If you want to allow users to select more than one choice:
- Set the 'Allow multiple selections' to 'Yes'
- Change the 'Height' value to at least '2' so that users can better see their choices.
Once you have clicked 'OK', if you add the text 'Research interests:' to the cell beside the drop-down menu, your form should look as follows:
With a five pixel cell-padding added to the 'table properties' and the right column increased in width, this is how the completed form looks in the browser:
Step 12
Before the user can submit their information you need to set which script will handle your form.
- Right-click anywhere within the form and select 'Form Properties'.
- Select 'Send to other' and then click 'Options'.
- The 'Options' window will appear.
- Change the 'Action' field to read 'http://www.lse.ac.uk/cgi-bin/mailform'. Leave the 'Method' field as 'POST' and the 'Encoding type' blank.
- Click 'OK'.
Step 13
You must specify the email account which will receive the form data. Here's how to set the recipient email account:
- Right-click the email form and select 'Form Properties'.
- Click the button at the bottom of the 'Form Properties' window labelled 'Advanced'.
- Click the 'Add' button.
- You must set the 'Name' as 'recipient' [all lower case letters], and your email account up to the '@' symbol as the 'Value'. Do not include '@lse.ac.uk'. In the above example, 'Name' is set as 'recipient' and 'Value' is set as 'webeditors.enquiries'.
- Click 'OK'. The recipient information you have just entered is hidden from the user and is not visible on the page. If you want to change the email account, select 'Form Properties' -> 'Advanced' and then select the Name/Value to change and click 'Modify'. This will open the 'Name/Value Pair' window again.
Step 14
There are two other 'Name/Value' pairs which you can set but are not required for the form to email you the user's information.
The first is the subject of the email and is useful if you have more than one form on your site and want to distinguish which form the user has used to submit their details.
The second is the location of a sent-acknowledgement page which thanks the user and tells them that their information has been sent. By allowing you to specify this page within your site, you can include links back to your homepage.
If either of the two optional 'Name/Value' pairs is missing, the email subject will be 'mailform message' and the sent-acknowledgement page will be a general thank-you.
Our best-practice advice would be to make use of both options.
Here's how to insert the email subject information:
- Right-click the form and select 'Form Properties'.
- On the 'Form Properties' window, click 'Advanced'.
- On the 'Advanced Form Properties' window click 'Add'.
- Enter the 'Name' as 'email_subject' [must be all lower case with the two words separated by an underscore].
- Enter the 'Value' as whatever is appropriate, e.g. 'Conference form'.
- Click 'OK'.
Here's how to insert the sent-acknowledge page location:
- Create the sent-acknowledgement page in your FrontPage Web as you would any normal page, e.g. 'sent-page.htm'.
- Right-click the form and select 'Form Properties'.
- On the 'Form Properties' window, click 'Advanced'.
- On the 'Advanced Form Properties' window click 'Add'.
- Enter the 'Name' as 'sent_page' [must be all lower case with the two words separated by an underscore].
- Enter the 'Value' as the full location of your sent-acknowledgement page, e.g. 'http://www.lse.ac.uk/collections/your-department/sent_page.htm'.
- Click 'OK'.
You can now publish your pages and test if you have set the form values correctly by submitting some test information.
^ Back to top

